
Quickly create workflows, business and process automation pipelines. Supports API, UI and Cron based workflows.
Spate Documentation
Join the discord: https://discord.gg/9unhWAqadg
Get started in 1 minute!
| Easily create and run Workflows |
|---|
 |
Watch the 30 second video of custom Form automations
https://user-images.githubusercontent.com/26391921/145500806-ee2332b6-52d6-43aa-93b7-6530d66dbcf5.mp4
Watch the simple workflow that summarizes articles
https://user-images.githubusercontent.com/26391921/159962335-ded8f760-8f32-469d-83c9-dcdded25df51.mp4
Table of Contents
- What is Spate?
- Use Case
- How it Works
- Getting Started
- Setting Up Your First Workflow
- Setting Up a Form Workflow
- Using the Spate CLI
- Tips
- FAQ
- Disclaimer
- Development
- Todo
What is Spate?
Spate is a workflow and automation platform that allows anyone to quickly automate technical/business processes. It was first developed for the Information Security space however it can be used for any vertical. While automation is not always the answer, teams can use this platform to become more efficient and spend their precious (manual) time on other tasks. For example - I recently used Spate to perform health checks of all my public facing websites and if the health endpoint was not healthy, my workflow sent a text message to me and updated the status page.
Use Case
Here are some popular use cases that Spate can be used for..
- Automate ETL processes - pull data from 3rd party services, parse, and serve the formatted data for other services as a API endpoint
- Create UI forms that upon submission, parses the data, sends a email/text message and notifies the user
- Periodically (based on conditions) execute and check the status of your webpages and automatically build a dashboard
- Parse a submitted CSV file and return a HTML report
- Automate really any manual process
How it Works
Spate is built on Flask (e.g. python framework) and leverages containerization (docker) for executing workflows. A “Workflow” is just a set of blocks that contain your automation tree. Users can use the drag-and-drop UI to add and connect Operators (blocks of logic) to their Workflow. Each Workflow has its own docker container.
Spate currently supports “API”, “FORM”, and “CRON” Triggers. A trigger is “how” the Workflow is executed. For example, if your Workflow contains the “API” trigger, then users can visit a API endpoint to start the Workflow. “FORM” trigger shows a custom UI-based form. The “CRON” trigger executes every X minutes and runs your Workflow. These three triggers will support the majority of your Workflows.
Users can add Operators to your Workflow and also edit the code. Everything is in “python” code. So if you understand Python, you can easily update/edit/add new Operators for your business process. Official operators can be viewed here
Getting Started
You can get started by either building the images locally or running the already built ones. I recommend option #1.
1.) Pull from docker hub
- Make sure docker is installed (ubuntu works fine)
- Clone the repo
- Create base image with:
cd docker_image && docker build -t base-python . && cd .. - Start the containers:
docker-compose up -d postgres_db && sleep 10 && docker-compose up -d spate_ui && docker-compose up -d spate_poller spate_cron spate_ingress - Visit
https://your-ip:8443. Email isadmin@example.comand password isadmin - Check the Health of your deployment
- See the following “Setting Up Your First Workflow” section for your first Workflow
2.) Build locally and run
- Make sure docker is installed (ubuntu works fine)
- Clone the repo. Change the
imagereference in thedocker-compose.ymlfile to point to the local images that you will build (basically remove thebmarsh13/prefix) - Build the images with:
cp tools/build_all.sh $PWD && bash build_all.sh && rm build_all.sh - Create base image with:
cd docker_image && docker build -t base-python . && cd .. - Start the containers:
docker-compose up -d postgres_db && sleep 10 && docker-compose up -d spate_ui && docker-compose up -d spate_poller spate_cron spate_ingress - Visit
https://your-ip:8443. Email isadmin@example.comand password isadmin - Check the Health of your deployment
- See the following “Setting Up Your First Workflow” section for your first Workflow
3.) (Optional) Install the spate-cli tool to run workflows
- The spate-cli tool can be found here
Setting Up Your First Workflow
After the “Getting Started” section above, lets set up and execute a API based Workflow.
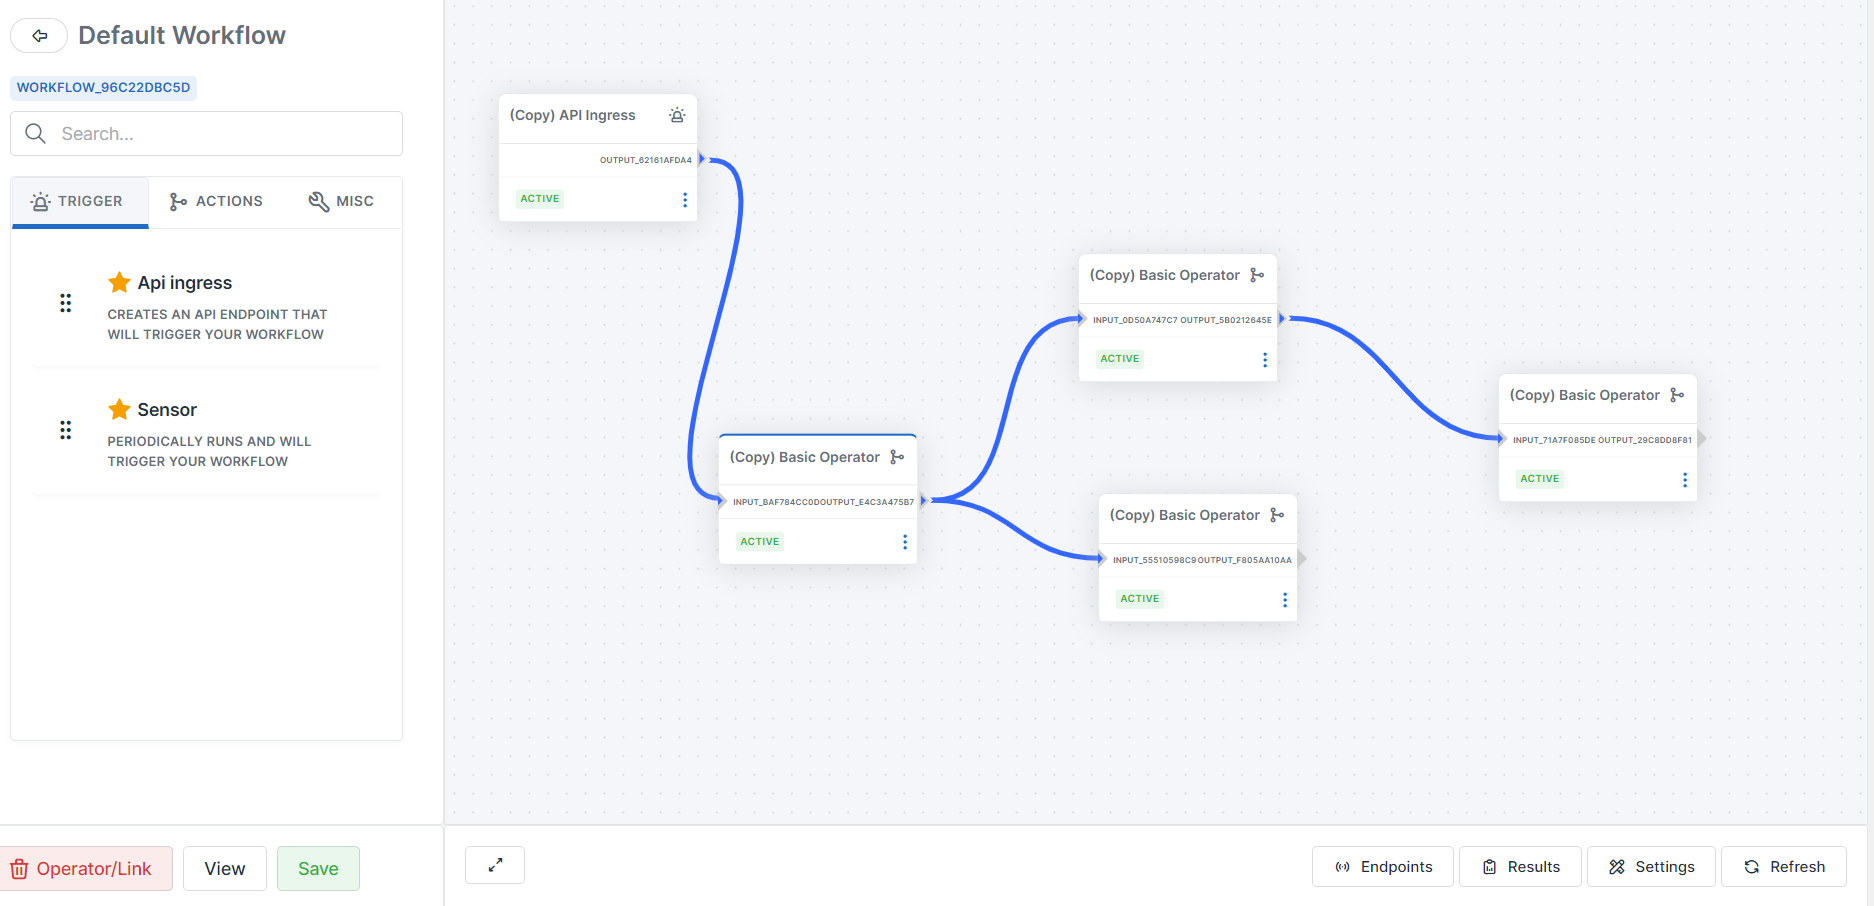
1.) Select the “Graph” icon on “Default Workflow”
2.) Drop the “API Ingress” and “Basic Operator” (under Actions) and connect them. After, hit the “Refresh” button at the bottom right (IMPORTANT)
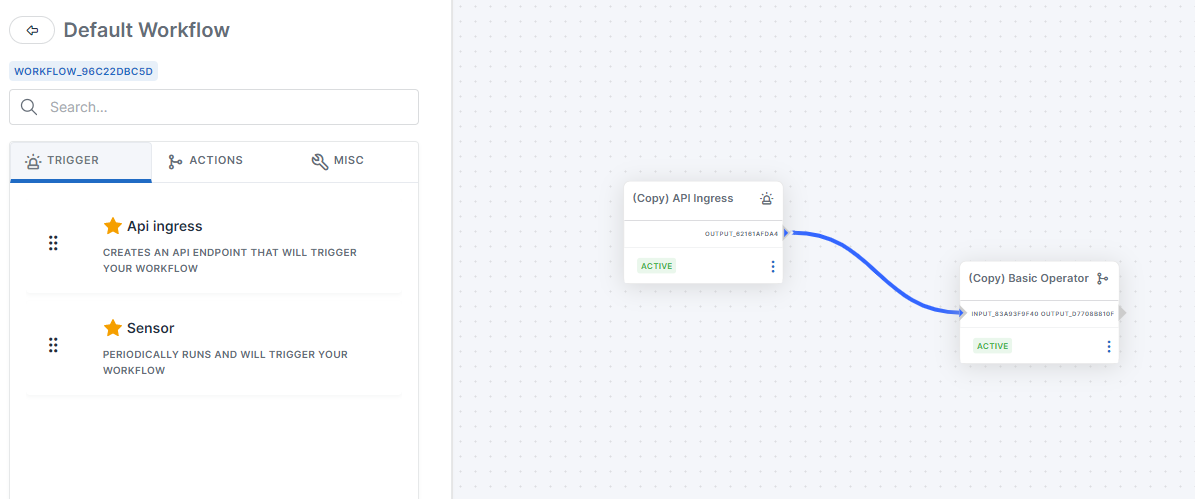
3.) Visit the API endpoint (port 443) to start the Workflow
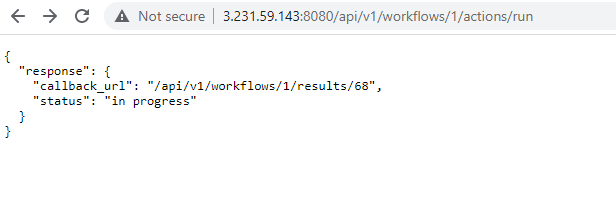
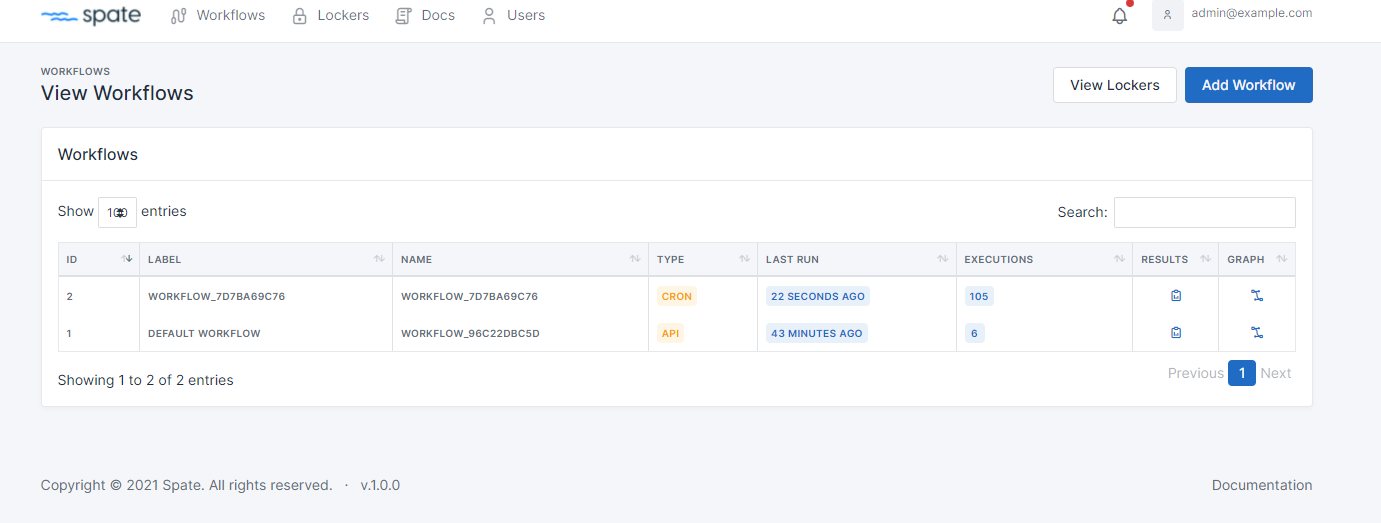
4.) Go back to the Workflows page and select the “Results” icon

5.) View the results of your Workflow

Setting Up a Form Workflow
We are going to show you how to set up a form based workflow using a FORM trigger. Remember, there are three (3) types of triggers (api,cron and form). The Form trigger will allow us to create your own Form and when someone visits/submits data, we can process it.
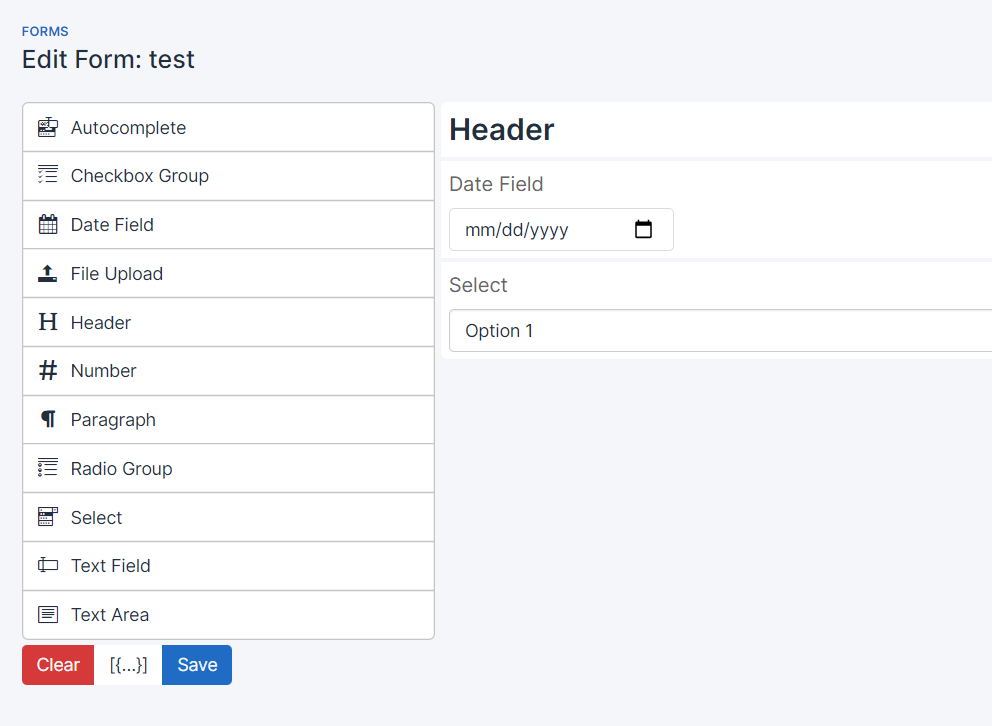
1.) At the top of the page, select Form and Add Form

2.) Drag and drop components onto your form. Once complete, click Save and input a label/description and Save
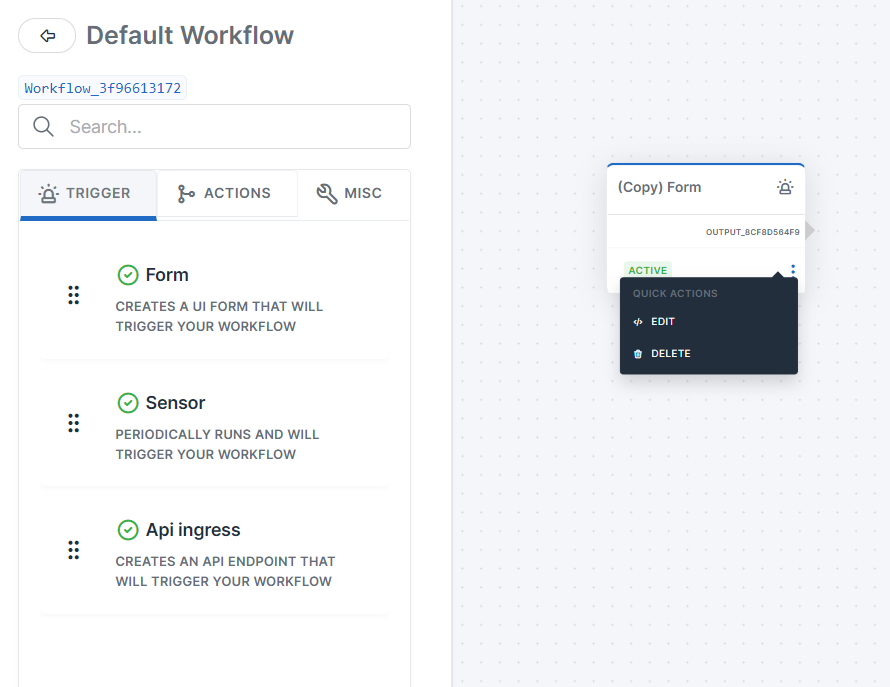
3.) Click on your Workflow, drag “Form” trigger onto the map and click edit
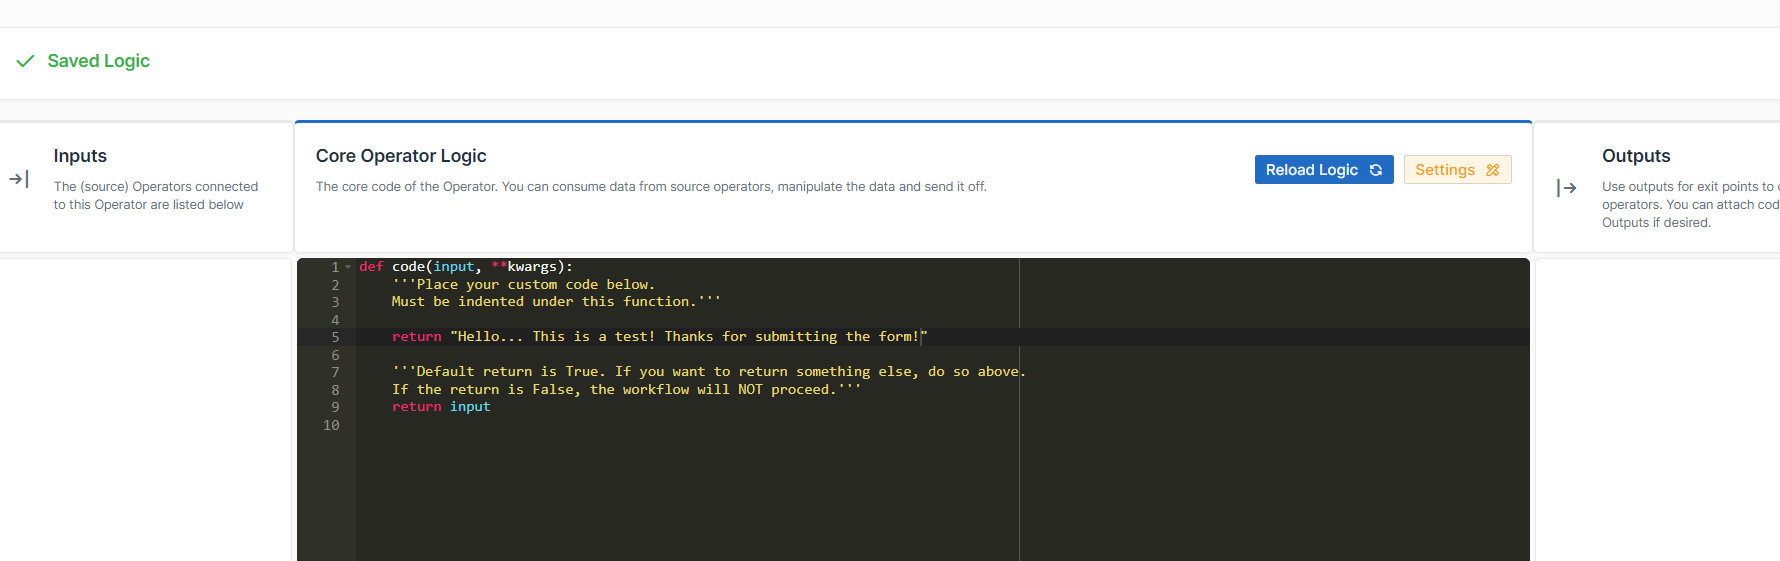
4.) I added some code as seen in the screenshot… return "Your message here" onto the operator. Click Save in the botton right.
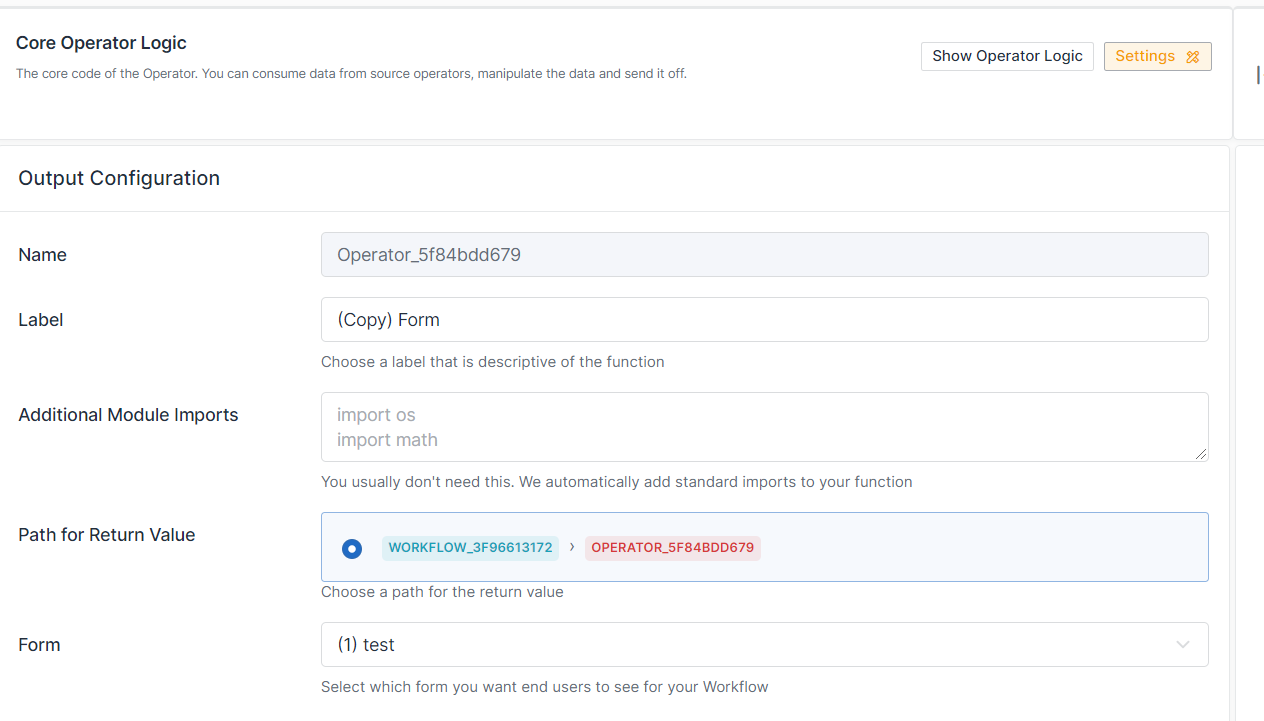
5.) Now click the “Settings” button (yellow ish). Scroll down to the bottom, Select the return path AND your form you created. Make sure to click save in bottom right.
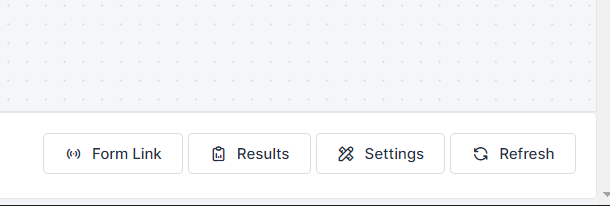
6.) Close the modal and select “Refresh” in the bottom right corner. Then select “Form Link”. This is the link of your form (on a different port)
7.) Visit the link in a new tab in your browser (as shown below)
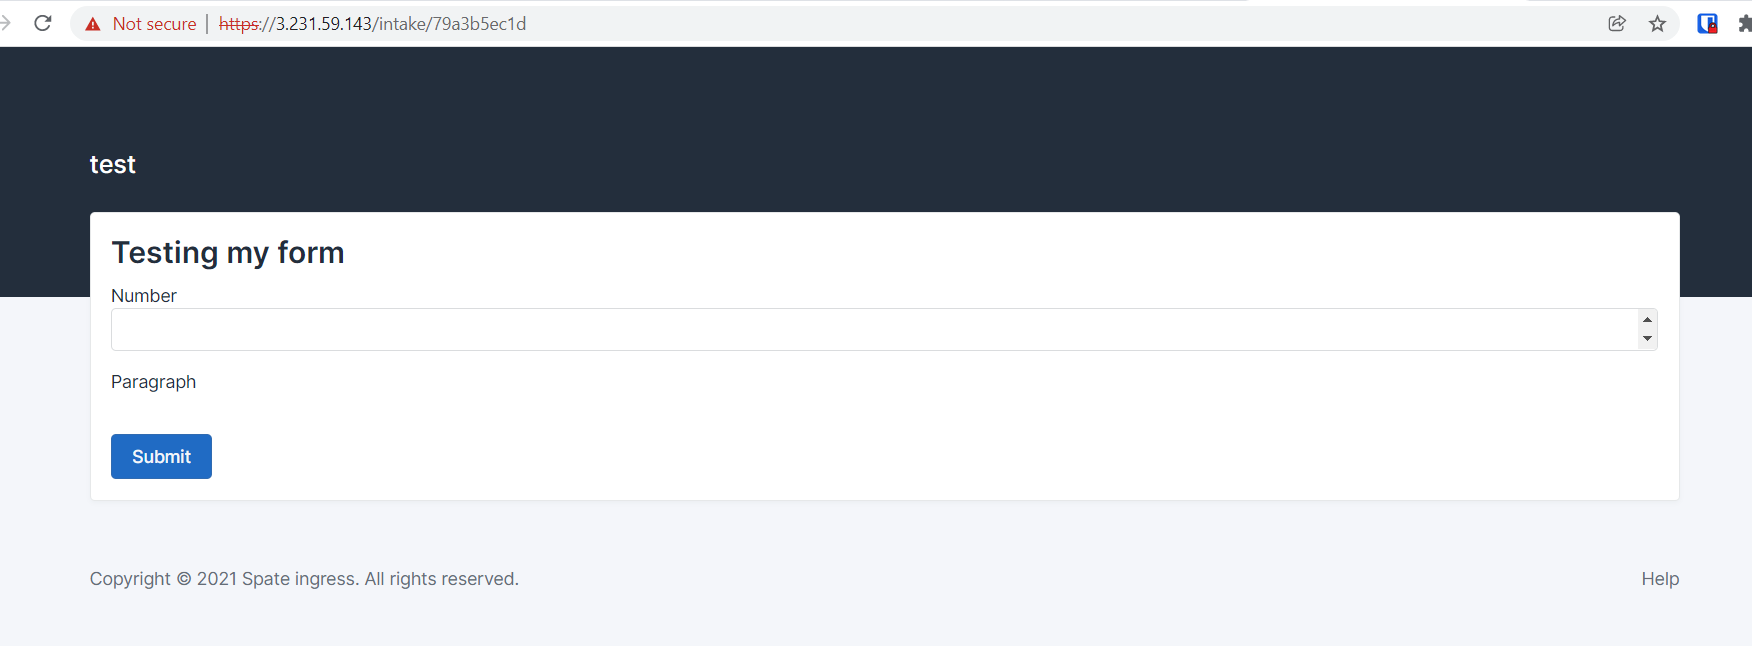
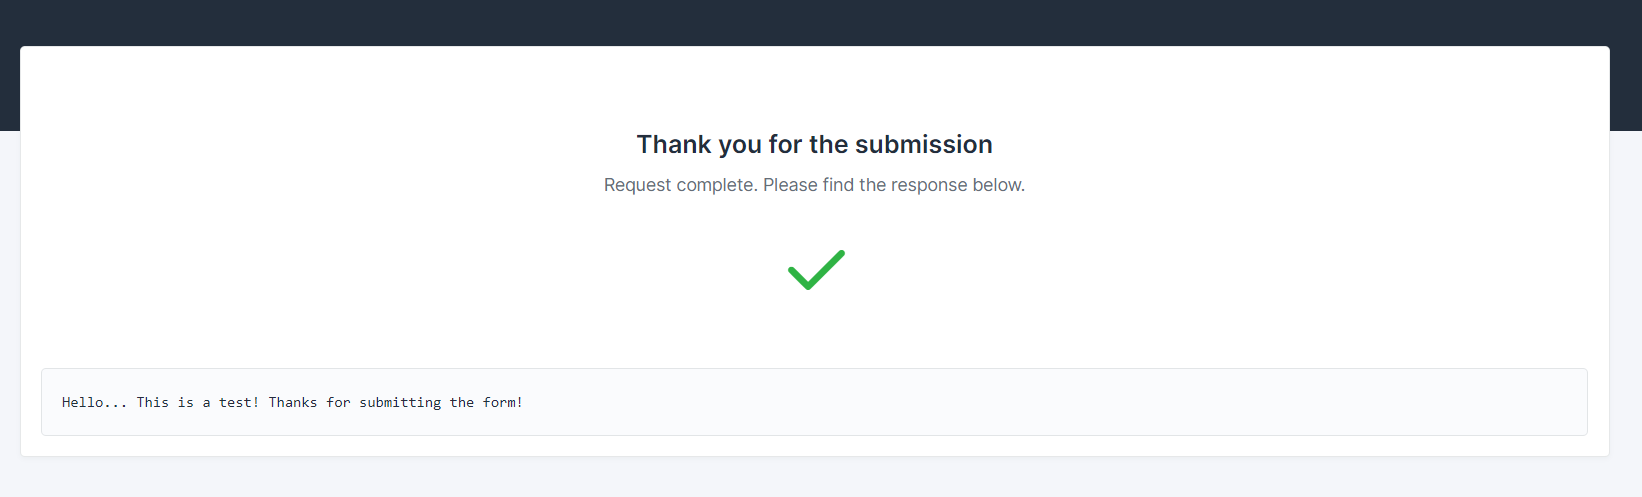
8.) Add dummy data to the form and click “Submit”. After submission, your workflow will execute and in a few seconds, the page will update. Notice that your message appears in the response.
Using the Spate CLI
The Spate CLI allows you to easily connect, execute and query that status of your API based workflows. I created this CLI tool as a quicker way to programmically interact with your workflow. You would typically have to interact with the Spate API with a language (python, powershell, java, etc) but the CLI is a exe that transparently handles that.
First, download the Spate CLI exe for your OS. There is a Linux and Windows release. For Linux, you likely must run chmod +x spate-cli to make it executable.
Show Help menu
./spate-cli --help
Execute workflow
./spate-cli --uuid <workflow uuid> --skip-verification --action execute --wait --url <https://spate-ingress>
Check status of executions
./spate-cli --uuid <workflow uuid> --skip-verification --action view --url <https://spate-ingress> --token <auth token from UI>
Tips
# Get value from locker(s). Lockers are added to Workflows and typically hold sensitive values
my_value = locker(kwargs["config"],"your_locker_name","your_key")

# If trigger is a API endpoint, access the incoming request attributes
request = kwargs["request"]

# Get value from store. This allows you to get data between Operators and Links within your Workflow
my_value = get_store("your_key")

# Put value into store. This allows you to share data between Operators and Links within your Workflow
put_store("your_key","your_value")

# Log debug messages
logging.info("message")
logging.debug("message")
logging.warning("message")
logging.critical("message")

# Create UI form for Operator variables
my_var = locker(kwargs["config"],"default","my_var") ##input:type=number:name=my_var:label=Please enter a number
FAQ
What are the different docker images?
There are 5 custom docker images and the 6th is a postgresql image (which may not be used if you are using something like RDS).
- spate-ui - This is the main UI portion (on port 8443)
- spate-ingress - This container (on port 443) has a API endpoint for workflows that have a API trigger. It also has endpoints to support the Form trigger. You use this endpoint to execute your workflows.
- spate-cron - This container (no listening ports) queries all the workflows with a Cron trigger and executes the workflow.
- spate-poller - This container performs some background jobs such as removing unused images/containers
- base-python - This image is used as the “base” image for the Workflows. Spate deploys your code into this container and executes it.
How does Spate execute code?
Each Workflow will have its own docker container. When you create a new Workflow, Spate starts a container with the Workflow name. When your workflow is executed (either through API or the Cron trigger) the code from the workflow is executed within the docker container.
What are Operators and Links?
Operators are the small blocks you see in the workflow. They can contain code and are the building blocks of your workflow. Links just connect the operators together and can also contain code. If the code within the Operator or Link returns False (e.g. return False), the path in the workflow will stop execution. Any other value and the path will continue. Typically I recommend keeping the code within the Operator very specific and include logic within the Link code. For example, if you are a making a network request to a API endpoint, include that code within your Operator and processing the success/error within the Link. Official operators can be viewed here
What are Triggers and Actions?
Triggers and Actions are a type of Operator. Triggers will initiate the workflow and Spate currently supports “API”, “Cron” and “Form” triggers. If your workflow has a API trigger, Spate sets up a API endpoint and if you hit that endpoint (with curl or your browser for example), the workflow will execute. The Form trigger presents a UI based form that you can build and collect input from the end user. Upon submission, your workflow runs. If your workflow has a Cron trigger, it will execute your workflow every X minutes (this is configurable). On the other hand, Actions are Operators that code building blocks. For example, you might create a Operator that “Adds a row to Google Sheets” and you can save it and reuse it elsewhere.
What does the “refresh” button do on the Workflow graph?
The refresh button will take all of your code (on the Operators and Links in the Workflow) and deploy it (along with the neccesary imports/libraries) into a docker container so that it is ready for execution. When you update your Workflow, it does NOT automatically deploy the changes to the docker container. The refresh button pushes the changes to the container. This is why if you update your code in the Workflow and are not seeing different results, you need to hit the Refresh button.
I setup my workflow and executed it, but the return value is None… what do I do?
You need to setup Path for Return Value. This can be found by editing the Trigger Operator in your Workflow and under Settings, selecting the return path. Once selected, the specific path in your workflow will now be the return value.
What are Lockers?
Lockers basically can hold key:value pairs that your workflow can leverage. For example, you can store env variables in the Locker or sensitive data such as API keys and/or passwords. Only workflows that have the locker added can access the data within.
How can I share data between workflow executions?
Let’s pretend you have a workflow that has executed twice. How does the second execution access data from the first? Maybe you want to save or access data between executions? You can use the “Store” to do this. Within your workflow code, you can use put_store("your_key","your_value") to add data to the store and my_value = get_store("your_key") to access the data. This way, you can share data between executions. It is good to note that this is NOT a solution to share large amounts of data. I would say if you are storing more than 1MB of data, then use a external database.
How can I access the request (from the end user) for API and Form triggers?
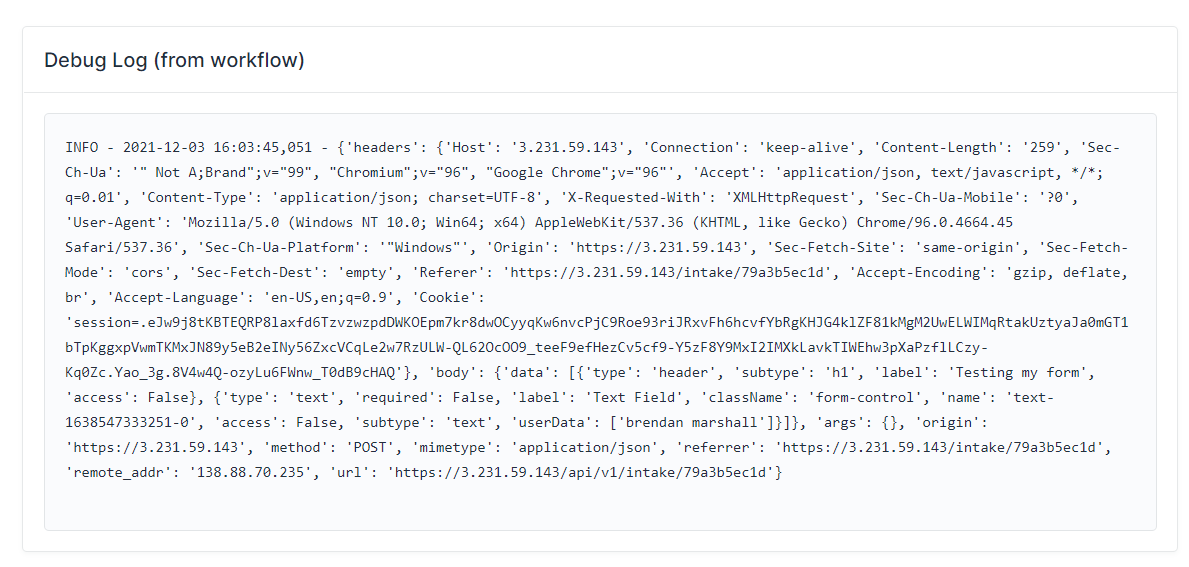
As you already know, the API and Form trigger consumes data from the end user. You can access this data within your workflow. For example, the headers, IP address, URL arguments and any data (form/body payload). This data is stored in the request. For example, if you insert in the following code within your workflow, logging.info(kwargs["request"]) and execute it (dont forget to refresh), and view the results within the UI, you will see the JSON object that you can parse. The most common use cases are you can check the IP address of the user, or return a custom/dynamic response to the end user based on the data they submitted in the form.
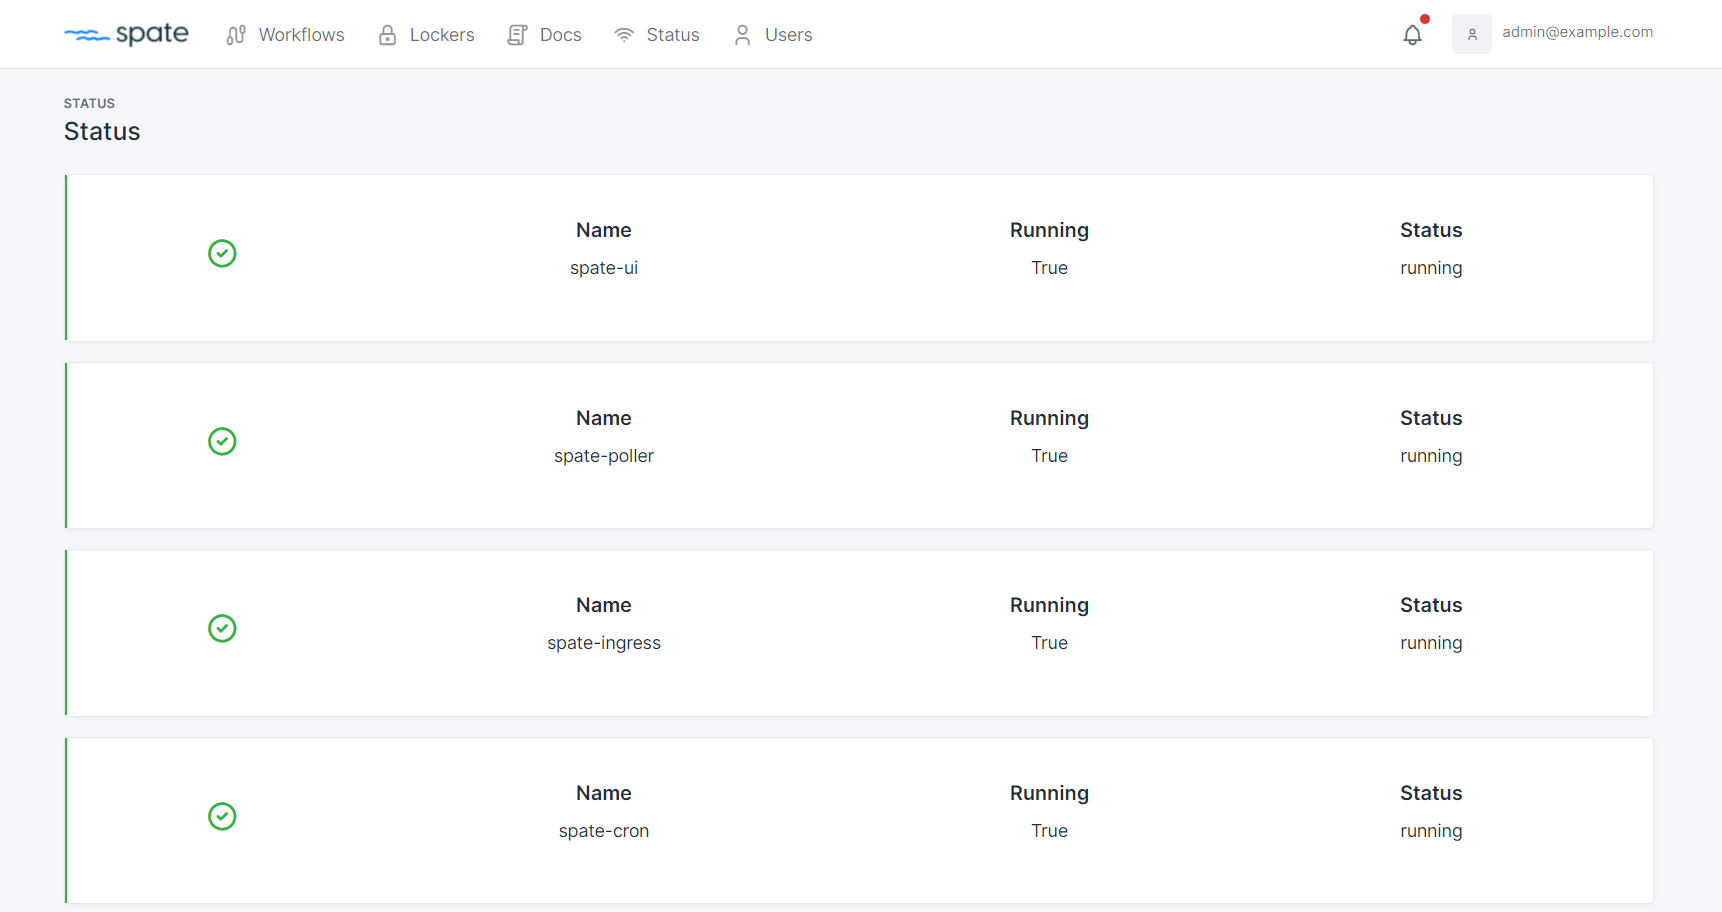
How do I know if my deployment is healthy?
I would say the best way is to check the “Status” page on the Spate-ui container. Log into the web UI (port 443) and navigate to the Status page in the header. If everything is healthy, you are good to go. If not, I would recommend re-reading the docs for getting started.
Is there a timeout on the workflow?
There is a default 30 second timeout for each execution. So if the code within the Operator or Link takes longer than 30 seconds to complete, the specific path will stop executing. If you want to set a longer timeout, you need to set the BLOCK_TIMEOUT env variable on the spate-ui container.
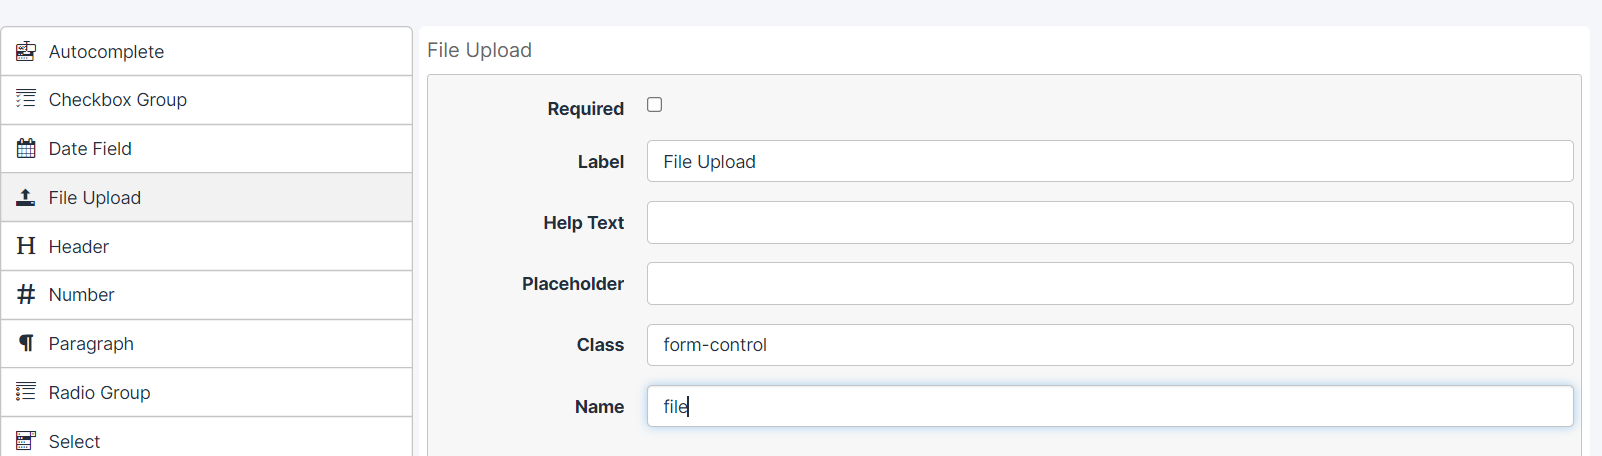
How can I access files uploaded to my workflow?
API and Form based workflows support files. In other words, if you POST a file (e.g. via curl) to the API endpoint, you can access/read the file in your workflow. The same thing for Form based workflows. Let’s look at Form based workflows first. Head over and create a Form in the UI. After you drop the File Uploadfield onto your form, you need to edit the name field and set it to file. See the screenshot below.
When a file is uploaded to your workflow, it gets saved to the docker container (files don’t persist on reboots!). To access the file within your workflow, see the following code to list all the files that have been uploaded to your execution
glob.glob("/files/{}_*".format(kwargs["config"]["execution_id"]))
Once you have the filename, you can perform whatever work needs to be done on the file. Just be aware that you could have multiple files uploaded (e.g. if your workflow is paused and resumed). And here is a example with Curl of sending a file (for an API workflow):
curl -k -i -X GET -H "Content-Type: multipart/form-data" -F "file=@test.txt" https://<your-ip>/api/v1/endpoints/<your-id>
Disclaimer
Spate should not be used with users that you do not trust. For example, you should not set up Spate and allow anyone in the world to connect and run workflows. It would be pretty easy for an attacker to obtain shell access to your servers by running a workflow.
Development
Stop docker images
docker-compose down
Create base image
cd docker_image && docker build -t base-python .
Build docker images
cp tools/build_all.sh $PWD && bash build_all.sh && rm build_all.sh
Authentication
admin@example.com:admin
Start docker images
docker-compose up -d postgres_db && sleep 10 && docker-compose up -d spate_ui && docker-compose up -d spate_poller spate_cron spate_ingress
Docker debugging
Your ‘docker ps’ command should look something like this (4 containers with spate_). Check the logs of the containers for errors.

Setting up developer workspace
The below steps will show you how to set up the minimal dev environment to edit the code of the specific containers. We will run everything in the foreground and use the Flask dev server so that your changes reload.
For spate-ui container:
- You will need a postgresql database set up. You can either install it on your local machine or start one via docker (and proxy it). I prefer the local machine set up. I just run
sudo apt install postgresql postgresql-contribto install it. Then I runbash setup_db.sh db1(found inspate/server_config) to set up the database. - After the database/roles are set up, I need to run
export SQLALCHEMY_DATABASE_URL="postgresql://db1:db1@localhost/db1" - Run
python3 manage.py init_dbto set up the tables - Run
python3 manage.py runserver -h 0.0.0.0and thespate-uiweb server will start onhttp://<your-ip>:5000
For spate-ingress container:
- Steps 1-3 in
spate-uishould already be complete. - Run
flask run -h 0.0.0.0 -p 5001fromspate/spate_ingressandspate-ingressweb server will start onhttp:<your-ip>:5001
For spate-poller and spate-cron:
- Steps 1-3 in
spate-uishould already be complete. - Run
python3 app.py
Service status
You can check the status of the deployment by viewing the “Status” page
TODO
- Add “Form” trigger
- Improve admin controls in UI (e.g. what users can edit/view workflows)
- Improve documentation
- Add RBAC to the Lockers
- Multi-processing of single executions of workflows (e.g. paths are executed)
- Pause workflows and wait for user response